Wednesday, 31 March 2010

Simon Says Stamps Challenge - Tim Holtz and distressing!

Morning!! Well I made it to the NEC!!!! All on my own, with no directions or satnav (don't ask LOL) just the names of the motorways in my head!! I had a fabulous time and spent far too much (gulp) and got the biggest blisters on the bottom of my feet I've ever seen! But, the best bit was I got to meet Bev and Jacqui finally!! woohoo!!! I also met Caz and Dawn. We had a great time having a little shop and natter until unfortunately I had to leave them to it as it was time for me to head for home. Oh and I met Barbro and John on the Just Magnolia stand too and thanked them for publishing my "Kara" letters in the MagnoliaInk magazine! Anway, back to business, and our challenge this week at Simon Says Stamps challenge is distressing. All the design team are showcasing Tim Holtz products (how can we not, he is the King of distressing LOL!). I knew as soon as I saw this Tim Holtz stamp that I wanted to create a wall hanger to hang above my oh so tidy (not) craft desk!
I started with some white card and splodged some ink from my distress ink pads onto my non stick craft sheet. The colours I used were Victorian Velvet, Bundled Sage and Antique Linen. I then sprayed it with water and pressed my card into it to get the lovely soft mottled background you can see. I also added some bleached out splashes with water. (you can see all of the instructions for this and many more techniques on Tim's own amazing blog here!! I used a variety of techniques from his 12 tags of Christmas from 2009 - thanks Tim!!

After distressing all the edges and inking with Vintage Photo I set about stamping. I stamped a couple of Hero Arts butterflies in Versafine and then coloured them with distress inks. I also stamped a Magnolia swirl and a ledger stamp from Simon Says Stamp's own stamp range.

I have then embossed in gold parts of a Hero Arts letter stamp over each butterfly.


The flourish is from Tim Holtz grungeboard elements and I've painted it with Frayed Burlap crackle paint and then once that was dry I covered it in Stardust Stickles.

This great saying is from a Tim Holtz stamp set - it really makes me chuckle and it is so true LOL!!! I have stamped it with espresso adirondack ink onto vellum and then distressed the vellum with antique linen distress ink.Now for the best bit (in my opinion)!!! I have made two roses following Tim's amazing tutorial! These are so gorgeous and desceptively easy to make! The metal flowers are also Tim Holtz.
Hope I have inspired you to join us this week at Simon Says Stamp! You have to check out the rest of the DT's work - absolutely incredible! Thanks for looking! x
please scroll down for my Whiff of Joy challenge post x

Whiff of Joy challenge - recipe

We have a recipe for you at the Whiff of Joy challenge this week - 1 ribbon, 2 buttons and 3 papers - nice and easy so I hope we have lots of entries! We have had a lot of entries lately without Whiff of Joy images so I'd just like to remind everyone that in order to enter you must use a Whiff of Joy image! Now, I must admit I struggle when there are more than 2 papers required LOL! I don't like covering gorgeous papers up so am not good at using lots of papers! I managed to fnd some reasonably plain ones so that I could use three without upsetting myself LOL! They are all from K&Co and I've distressed them with vintage photo distress ink and stickles.
I decided to use Melinda with Muffin basket, as she has been rather neglected but she is so gorgeous. I've coloured her with copics and added some stickles here and there on her outfit and around the image. The flowers are the "waste" of the new punch I got at the NEC.....

.....and here it is! Isn't it gorgeous, it is a Martha Stewart around the page punch. Here I've punched gold cardstock. The buttons are basic grey.
This gorgeous checked ribbon is from the Hobby House.

Hope you like it and I've inspired you to join us this week and don't forget to visit the challenge blog to see if you made the top 3 if you joined us last week! Thanks for looking! x

Tuesday, 30 March 2010

Kellie's amazing 100,000 hits candy!!!


(picture copyright All That Scraps)

WOW!!!!! Look at this amazing spring kit from CC Designs!!!! Aren't they all cuties!?!? I would so love to own this little lot wouldn't you?? The amazing Kellie from Magnolia Down Under is offering us all the chance to win one of these stunning kits in her 100,000 hits blog candy!!!! Thanks so much Kellie, it is an awesome prize and I'm keeping my fingers well and truly crossed (appart from when I'm crafting LOL). To see what you need to do to be in with a chance click here!!!

Monday, 29 March 2010

Whiff of Joy collection

This is my final card using the Whiff of Joy store kit and Bo Bunny papers! This is quite different for me as the main focus is the gorgeous large sentiment that comes in the kit! The papers have been distressed with tea dye distress ink and I created the gem swirls myself with some gems from the Hobby House.
The dragonfly has been coloured with distress inks and I have covered the wings in stickles. She looks a little strange on this photo as I had to chop off her antennae and legs LOL! I didn't have a pen thin enough to redraw them in until I dropped them off at the Hobby House so all is rectified now but I no longer have the card!

I made a bunch of flowers with the tulips stamp from the kit by bunching three of them together. They have also been coloured with distress ink.

The gorgeous punched detail has been created with MS lattice deep edge punch and I've added a ribbon and slider from the Hobby House.
Hope you've enjoyed seeing my little series of cards and thanks for looking! x

Sunday, 28 March 2010

Simon Says Stamp challenge - Children's Easter Challenge

If you're looking for something to occupy the children with over the Easter Holidays we are running a special Children's Easter Challenge on the Simon Says Stamp challenge blog!! It is for under 16's and will run for two weeks so they have plenty of time, and it is an open theme, so they can create whatever they like!

We have put together a special little design team for the challenge, all under 16 of course and my little boy, Connor is thrilled to be on the design team "just like Mummy" LOL! So, without further ado, here is Connor's card for your children's inspiration.


Connor decided to make an Easter card showing how many Easter eggs he would like to receive LOL! He used my Fiskars Ovals template to draw his eggs (whilst informing me he didn't need me to show him how to use it as they use templates at school LOL) and he's coloured the eggs in with his Crayola pencils. Bless him, the card is linen effect and he thought it was brilliant that when he coloured it created little squares in his colouring!

He has added some spring flowers using bits from my stash. A sugar coated brad for the yellow flower and the plastic flower he put together with a brad and three of my photo holders which he decided would make great leaves (and I have to say, I'm quite impressed with this idea - might case it LOL!) Safety conscious Mummy wouldn't let him push the brads through on his own though so he told me where he wanted them and I put them through for him.

For his other flower he chose an eyelet because he wanted to have a go with my Cropodile LOL so I let him squeeze the handles together to punch the hole and set the eyelet.


Connor wanted his card to be sparkly so he has added dots of stickles and lots of diecut dots from a Forever Friends kit that have little silver dots on them.


Connor hopes you like his colouring and his card which he is very proud of and even took it to show his teacher! Hope your children will have fun joining in with the challenge!

Saturday, 27 March 2010

Magnolia Down Under Challenge - Stitching

Yippee!! It is my DT group's turn at Magnolia Down Under Challenge this week and we have a great challenge for you of stitching! I loved making this card so much! I used my favourite new Tilda, colours that I love and I had a great idea and the card just flowed from there! I was lucky enough to be given some frosted shrink plastic last week and decided to have a play. I can't stop shrinking things now, it is so much fun watching how tiny and cute they get LOL! So, my idea was to make some flower buttons for this card and I love how they turned out! My paper was a plain BoBunny paper which I have stamped with a Hero Arts letter stamp as it looked too plain, and I have distressed the edges with bundled sage distress ink and stickles.
I used this gorgeous Ladybug Tilda and coloured her to match my papers and buttons. I've coloured her with distress inks and added stickles to the spots on her jacket and all the lace trims of her outfit.

So, here are my buttons. I stamped two different flowers from my Stempelglede grunge collection using different colours of Q chalks before punching the buttonholes and then shrinking.
I arranged my buttons in groups of three like a little garden around Tilda. Each one has a hand stitched stem and leaf which I have sewn with embroidery thread using a daisy chain stitch (if I remember the correct name from my school sewing class LOL). The stitching around the card and image was done with my sewing machine.
Here is a close up of one of my buttons. You can see the stamped design better in this photo.

I added a couple of butterflies punched with my MS punch with tiny gems for their bodies and stickled all over.
In the top right corner is a simple bow made with some tulle from the Hobby House.

Do pop over to the challenge blog and have a drool over the rest of the DT's gorgeous creations and I hope you can join in this week! Hope you like it and thanks for looking! x

Friday, 26 March 2010

SSS Friday Flowers Prima candy!


Yay! It is time for another Friday Flowers Prima candy sponsored by Simon Says Stamp! Simon Says Stamp carry the full range of Prima flowers if you haven't had a browse you really must go and have a look at the new range - oh so gorgeous, I want them all!!!!


and this is what you can win this week! you get 24 flowers in this gorgeous pack in such gorgeous coral colours! To enter please leave your details with Mr Linky below and if you can mention it on your blog that would be fab! I have a blinkie in my sidebar if you would like one for your sidebar. Good luck everyone!


Just Magnolia challenge - my sketch

Woohoo!!! It's Friday and that means it's nearly the weekend and it also means that it is the NEC show!!! Hopefully I'm not lost on the M something or other (great start I don't even know which motorway I'm supposed to be on LOL) while you're reading this because I'm going to the NEC today!!!! This is scheduled, obviously, and I should have been driving for an hour by the time you read this so hopefully I'm halfway there by now! It's the first time I've driven such a long way on my own for years so I've been very nervous about it! Anyhoooow, this week's challenge at Just Magnolia is a sketch by little old me!! It's a nice easy one, so I hope you like it! For my card I have used the last of a sheet of Basic Grey Wisteria paper I've had for ages. I distressed the edges with antique linen distress ink and stickles, I stitched them too!
I am just so in love with this litte Edwin aren't you? His little face is so cute! I have coloured him with distress inks and added stickles to his wings. I always seem to do his hair blonde as he reminds me of my little boy LOL! I stamped around the image with Magnolia's New Years swirl using antique linen distress ink and added some stickles to the swirls. I stamped Magnolia dot butterflies around Edwin and stamped them again on a separate sheet so that I could add dimension to their wings. I have added a touch of stickles to them all too.

I added a gorgeous selection of blue flowers, all sprayed with glimmer mist. The large blue rose is from Hobby Craft, the smaller roses and blossom from Wild Orchid crafts and the other flower is by Petaloo.
I have written the sentiment by hand with a gold gel pen and inked around it with antique linen distress ink before adding more stickles!

Hope you like it and can join us this week at Just Magnolia! The rest of the DT have created some stunning inspiration too! Hopefully I might bump into some of you at the NEC today and all assuming I manage to find my way home I'll show you the goodies I buy! x

Thursday, 25 March 2010

Whiff of Joy collection

Another of my little collection for you! I'm just loving the colours on these papers and this checked one is my favourite - I had to go back and get another sheet as it is nearly gone LOL! The edges have been inked with tea dye distress ink and the edges of the checked paper have been punched with MS daisy edge punch, top and bottom, although I've covered the bottom with flowers LOL!
The image has been coloured with distress inks and I have inked around the edge of the image with tea dye distress ink.
I made a little "garden" for the birdbath to sit in with a mixture of Prima flowers and flowers punched with an EK success daisy punch. The leaves have been punched with a Woodware punch and the spacers and brads and gems are from the Hobby House. I couldn't resist adding 3 little butterflies punched from the reverse of the checked paper with my MS butterfly punch - you know me and butterflies LOL!

Hope you like it and thanks for looking! x

Wednesday, 24 March 2010

Simon Says Stamp challenge - Easter/Spring

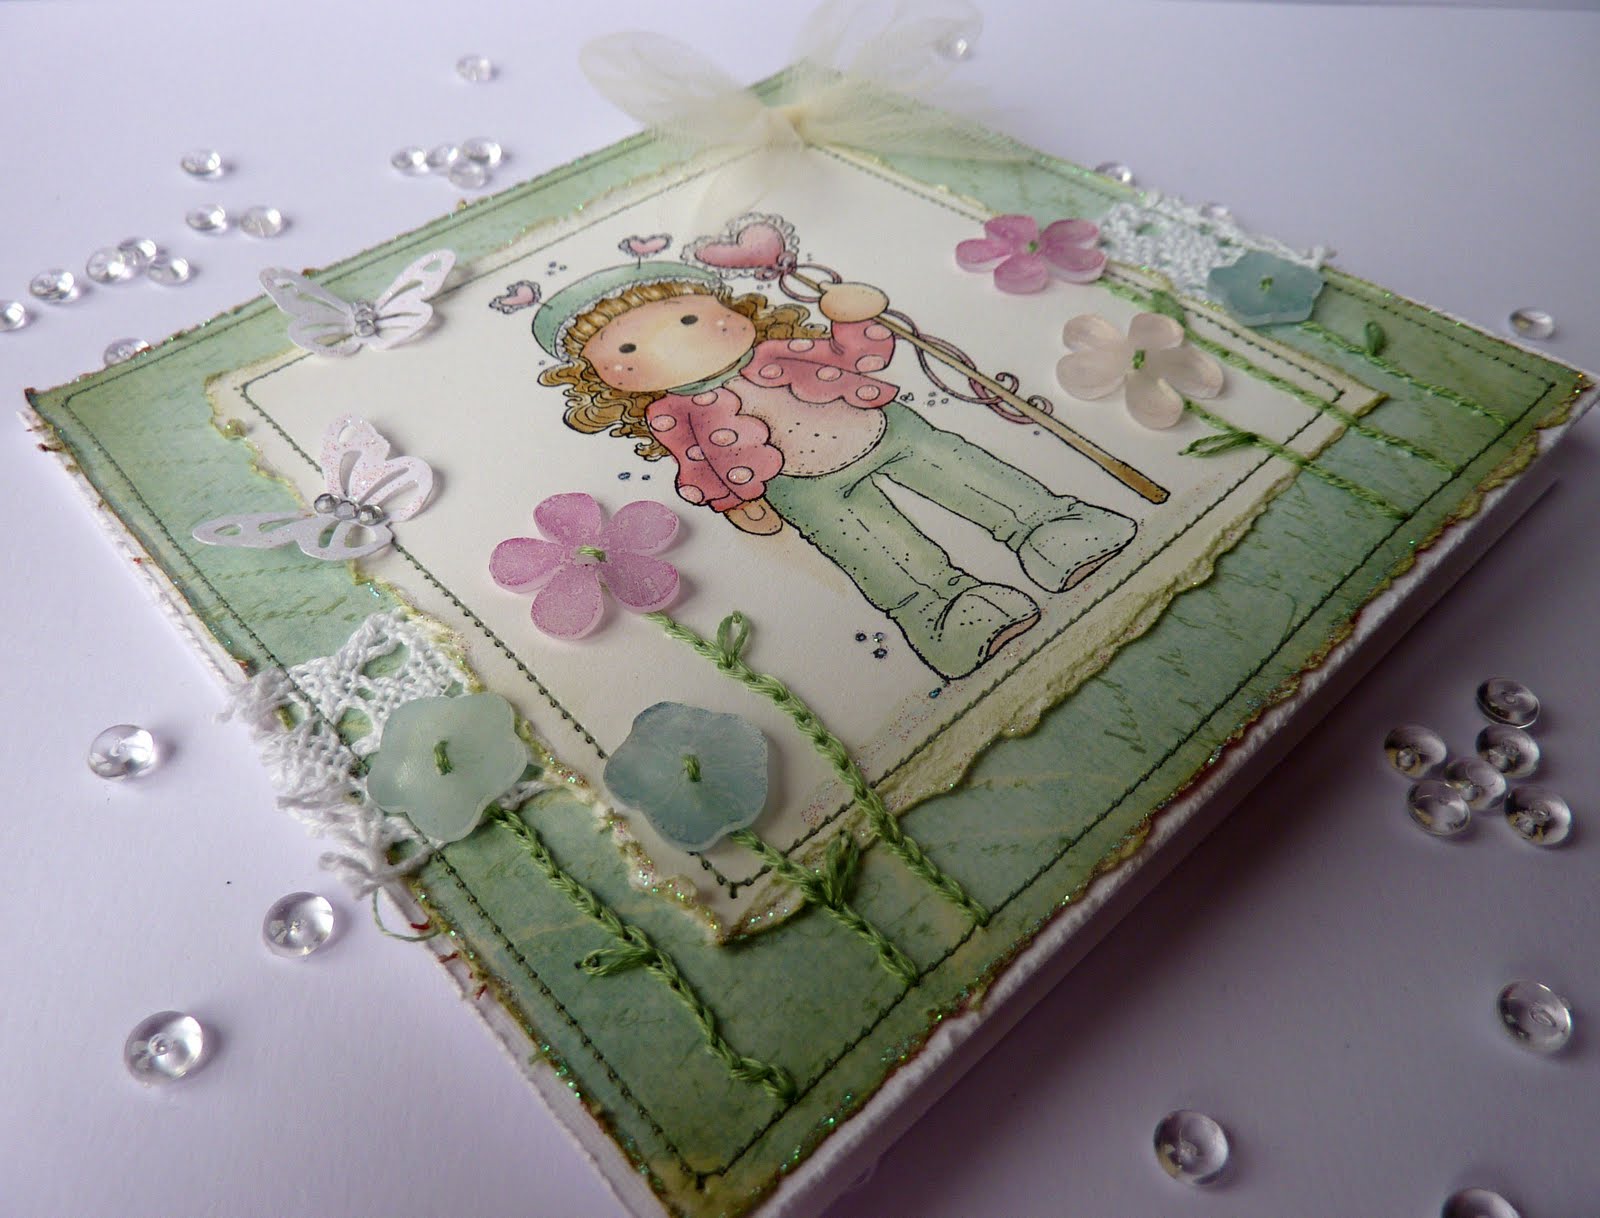
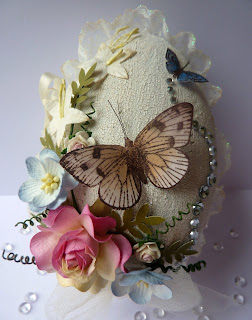
Woohoo!! It is time for another challenge at Simon Says Stamp!! This week we have a challenge of Easter or spring with glimmer and glitter!! I loved this challenge and I'm sure you will too. As you can see I have gone with the Easter theme and decorated an egg!! It started out life as a cardboard egg from Panduro Hobby and now it is a gorgeous feminine egg that I for one would love to receive full of chocolate! I have painted it with Tim Holtz crackle paint in picket fence and when that was dry I added pearl Glimmer mist and a touch of light distressing with vintage photo distress ink. I glued a ruffle of lace around the edge of each half which I also distressed with vintage photo. I have added stickles along the edge of the lace for some delicate sparkle!


I stamped two butterflies from the Hero Arts Antique Engravings stamp set and coloured them with copics before spraying with glimmer mist. The stamped antennae have been replaced with black cotton which makes them look so much more life like!


I have added a trail of gems running from the flowers to the small butterfly to indicate where it has fluttered from!
I've created a little flower spray with some flowers from my stash, all sprayed with glimmer mist. The leaves have been punched with a Woodware punch.

Once the two halves were nestled together I tied an ivory satin ribbon tied in a bow.
Hope you like it and thanks for looking! I hope you can pop over to the challenge blog to see the rest of the DT's amazing creations and I look forward to seeing what your create for us this week! x
This is my 2nd post today, please scroll down for my Whiff of Joy challenge post x

Whiff of Joy challenge - Bev's sketch


We have a gorgeous sketch for you at Whiff of Joy challenge this week by the amazingly talented Bev, I just loved using it and I'm sure you will too! I need several thank you cards for Kara's birthday presents so have made a start with this one! The gorgeous papers are Basic Grey Indian Summer collection and I've distressed them all and inked them with vintage photo distress ink.


I thought Charlotte with letter would be perfect to depict my little girl and complete the sentiment and image all in one go! I have coloured the image with copics and I stamped the letter and Charlotte's hands again so that I could create a 3D effect. I have stamped around the image with a swirl from the Whiff of Joy Christmas Swirls collection using tattered rose distress ink.


The lace and ribbon are from my stash and the gems along the ribbon are from the Hobby House.


The little buttons are from various collections of Basic Grey buttons - I must get some more as these tiny ones are just so cute!


The flower is Prima and I have teamed it with some leaves punched with a Woodware punch from gold cardstock and the swirls were punched with EK success punch from the base cardstock.


Hope you can join us this week and don't forget to pop over to the challenge blog to see the rest of the DT's amazing work and see if you made the top 3 if you entered last week! Thanks for looking! x