Showing posts with label Thank you cards. Show all posts

Friday, 22 May 2020

Best Tea-cher Ever!


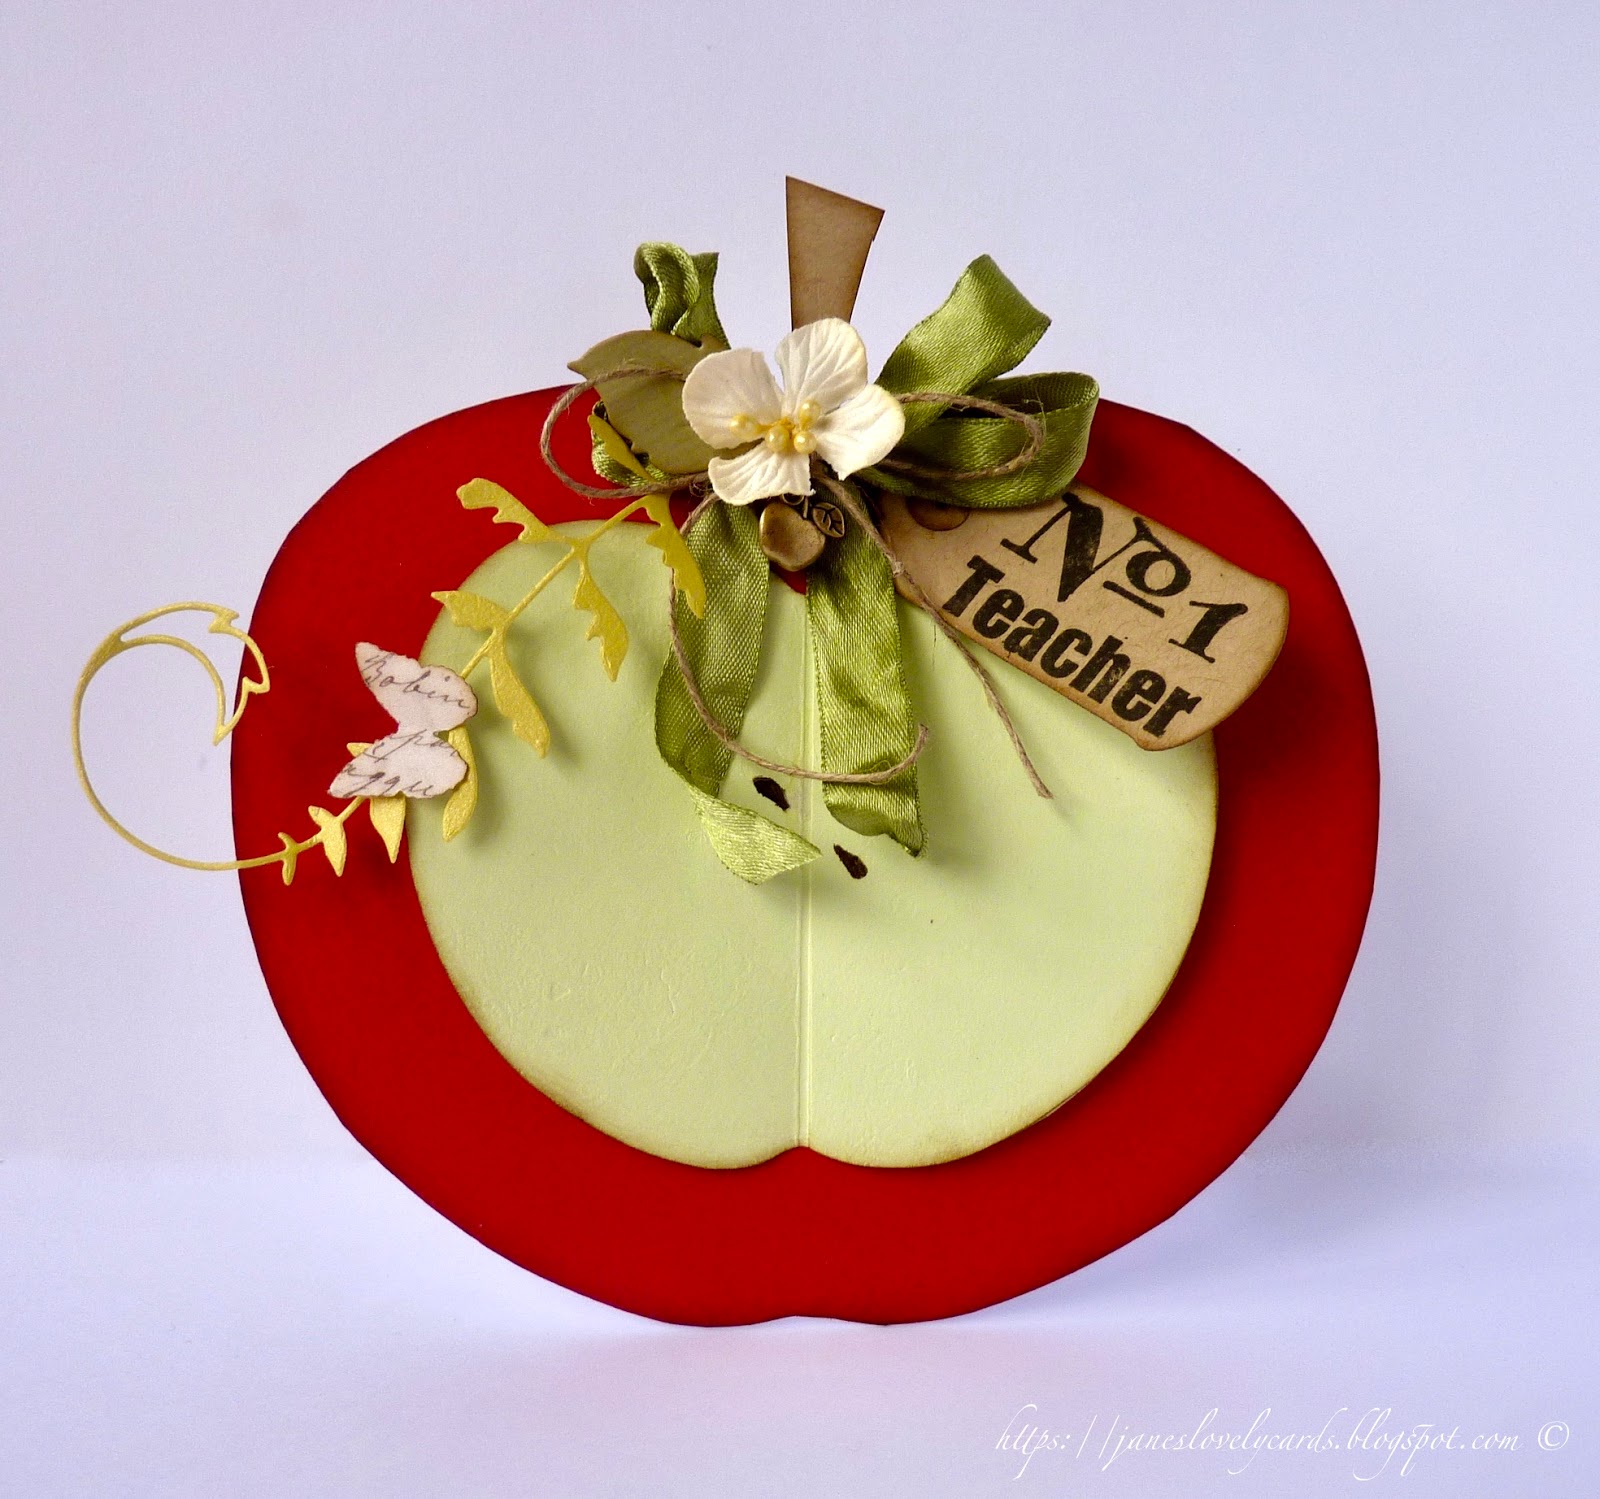
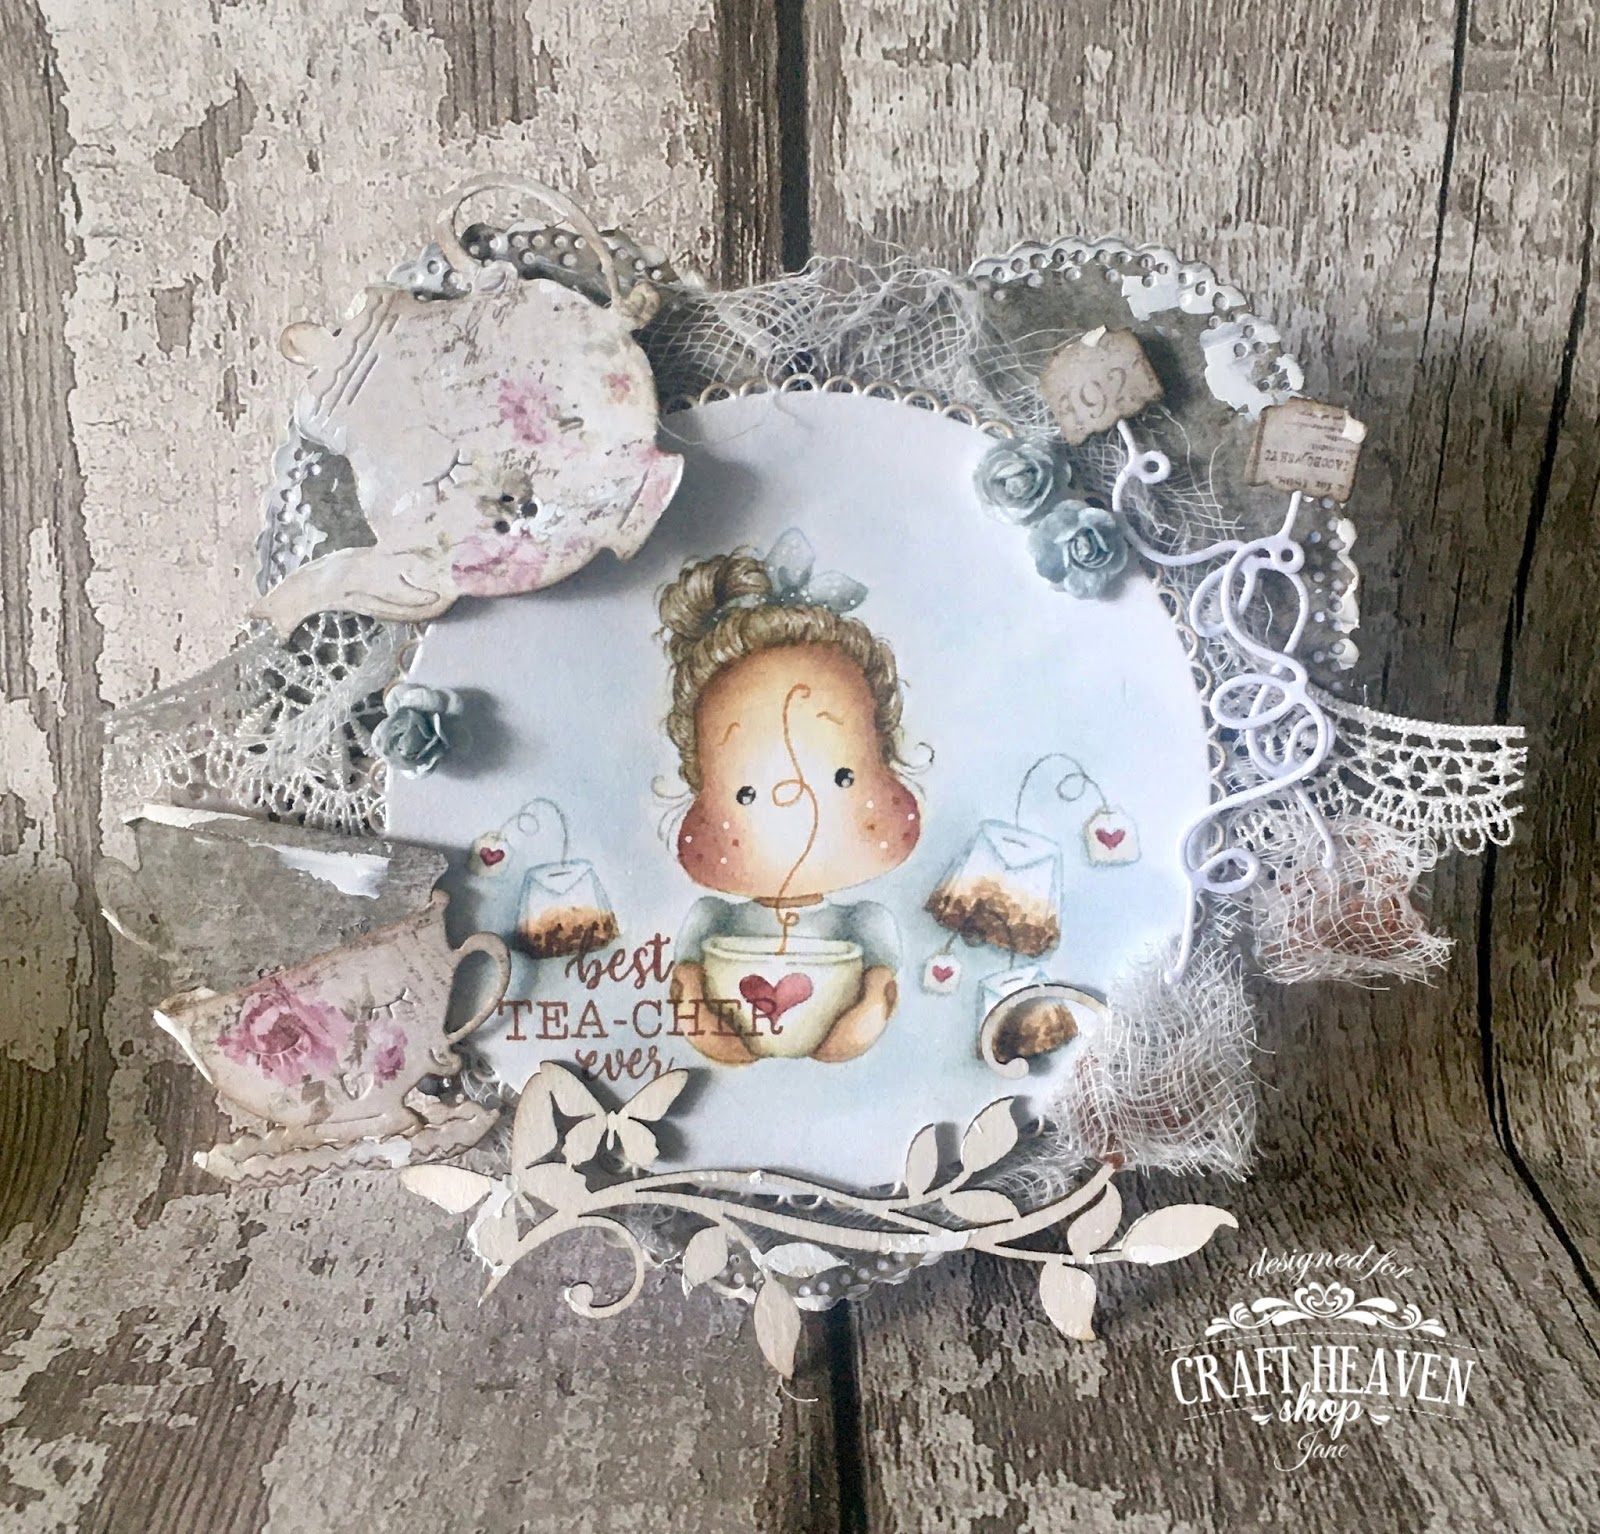
Good evening!  I hope my post finds you all safe and well in these worrying times.  It has been very hot and sunny the past few days here so I decided to spend some time painting an image in the garden instead of my craft room.  I have made a teacher thank you card with the resulting image, the gorgeous Best Tea-cher Ever stamp set from the Live, Laugh, Love Collection.


I have used all of the stamps in the set except the hearts and kisses stamp and layered the sentiment over parts of the image for a quirky look.  As always I have painted the images with Distress Inks using the no lines technique.


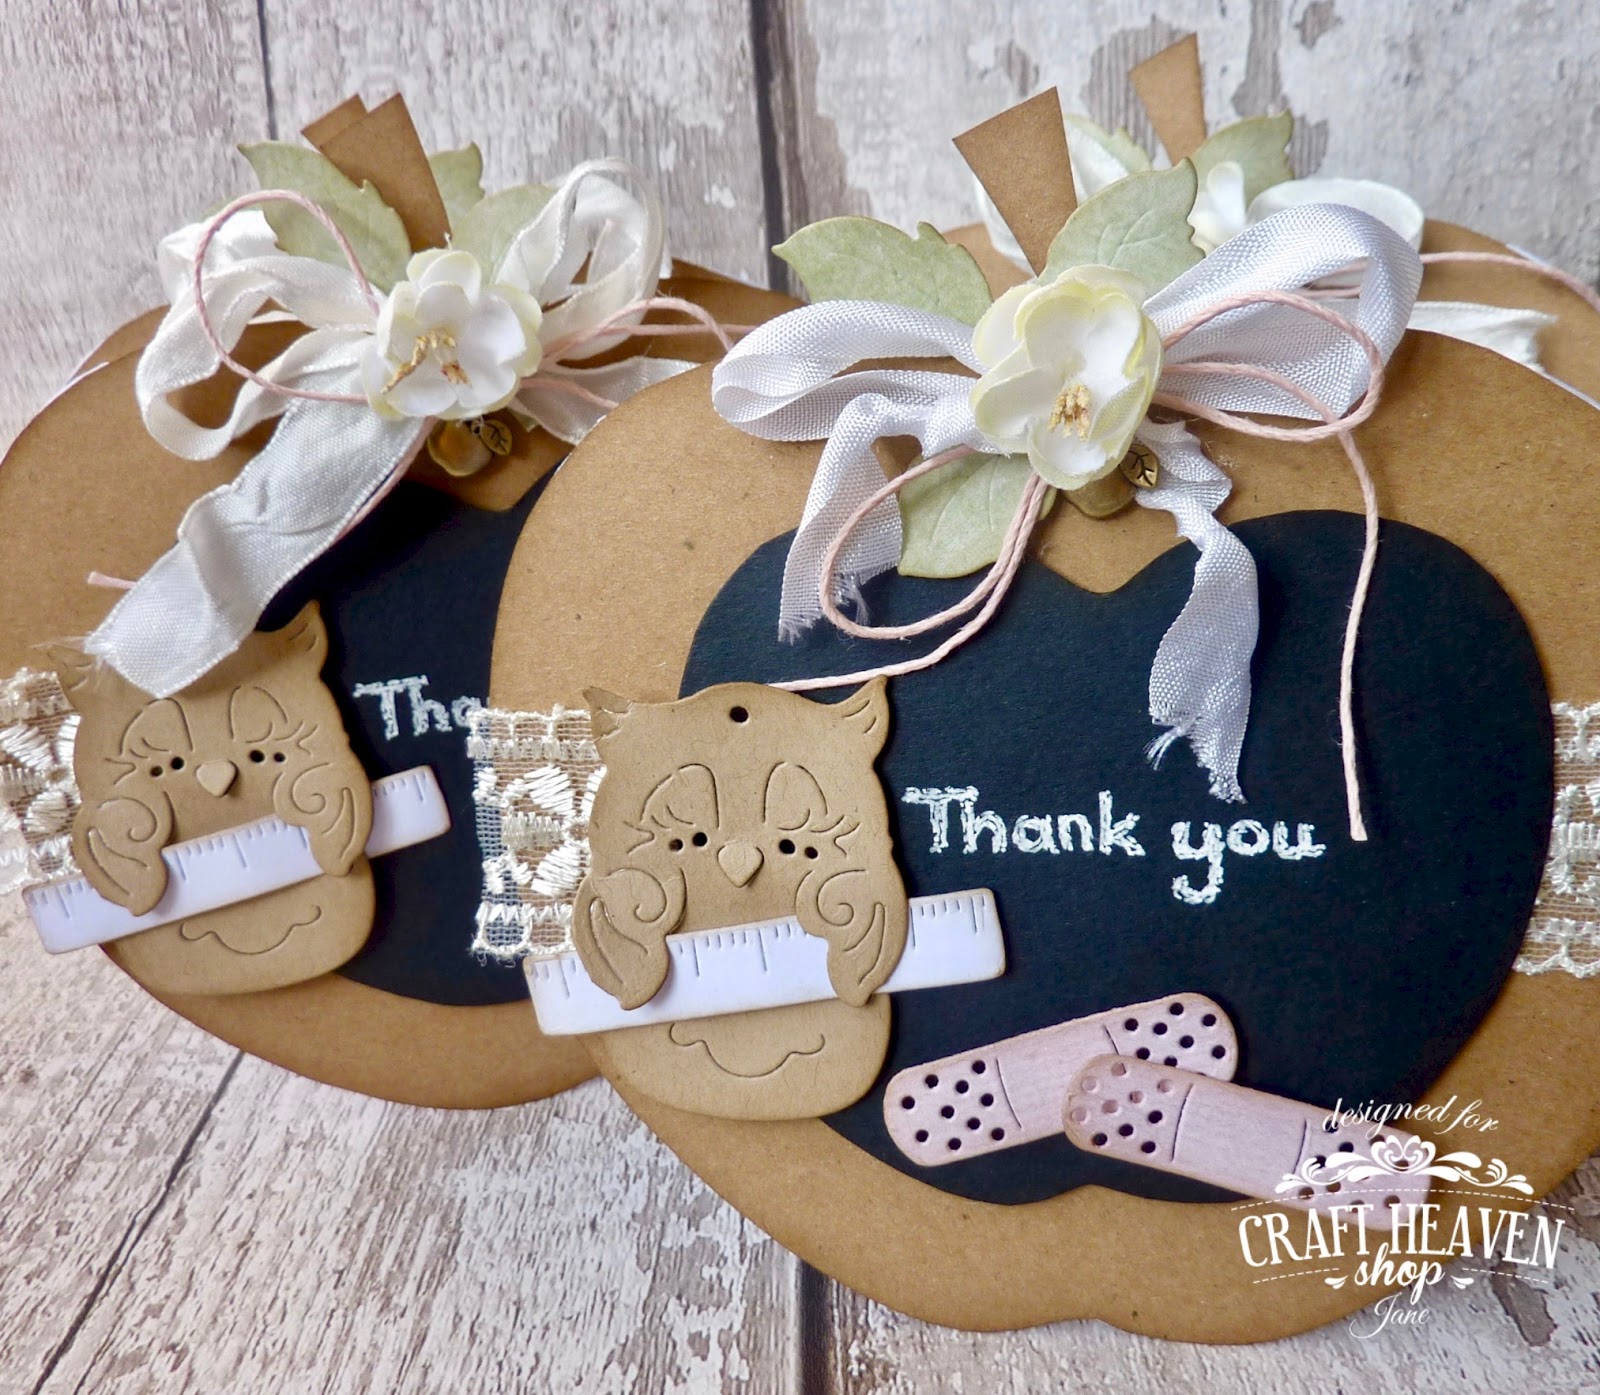
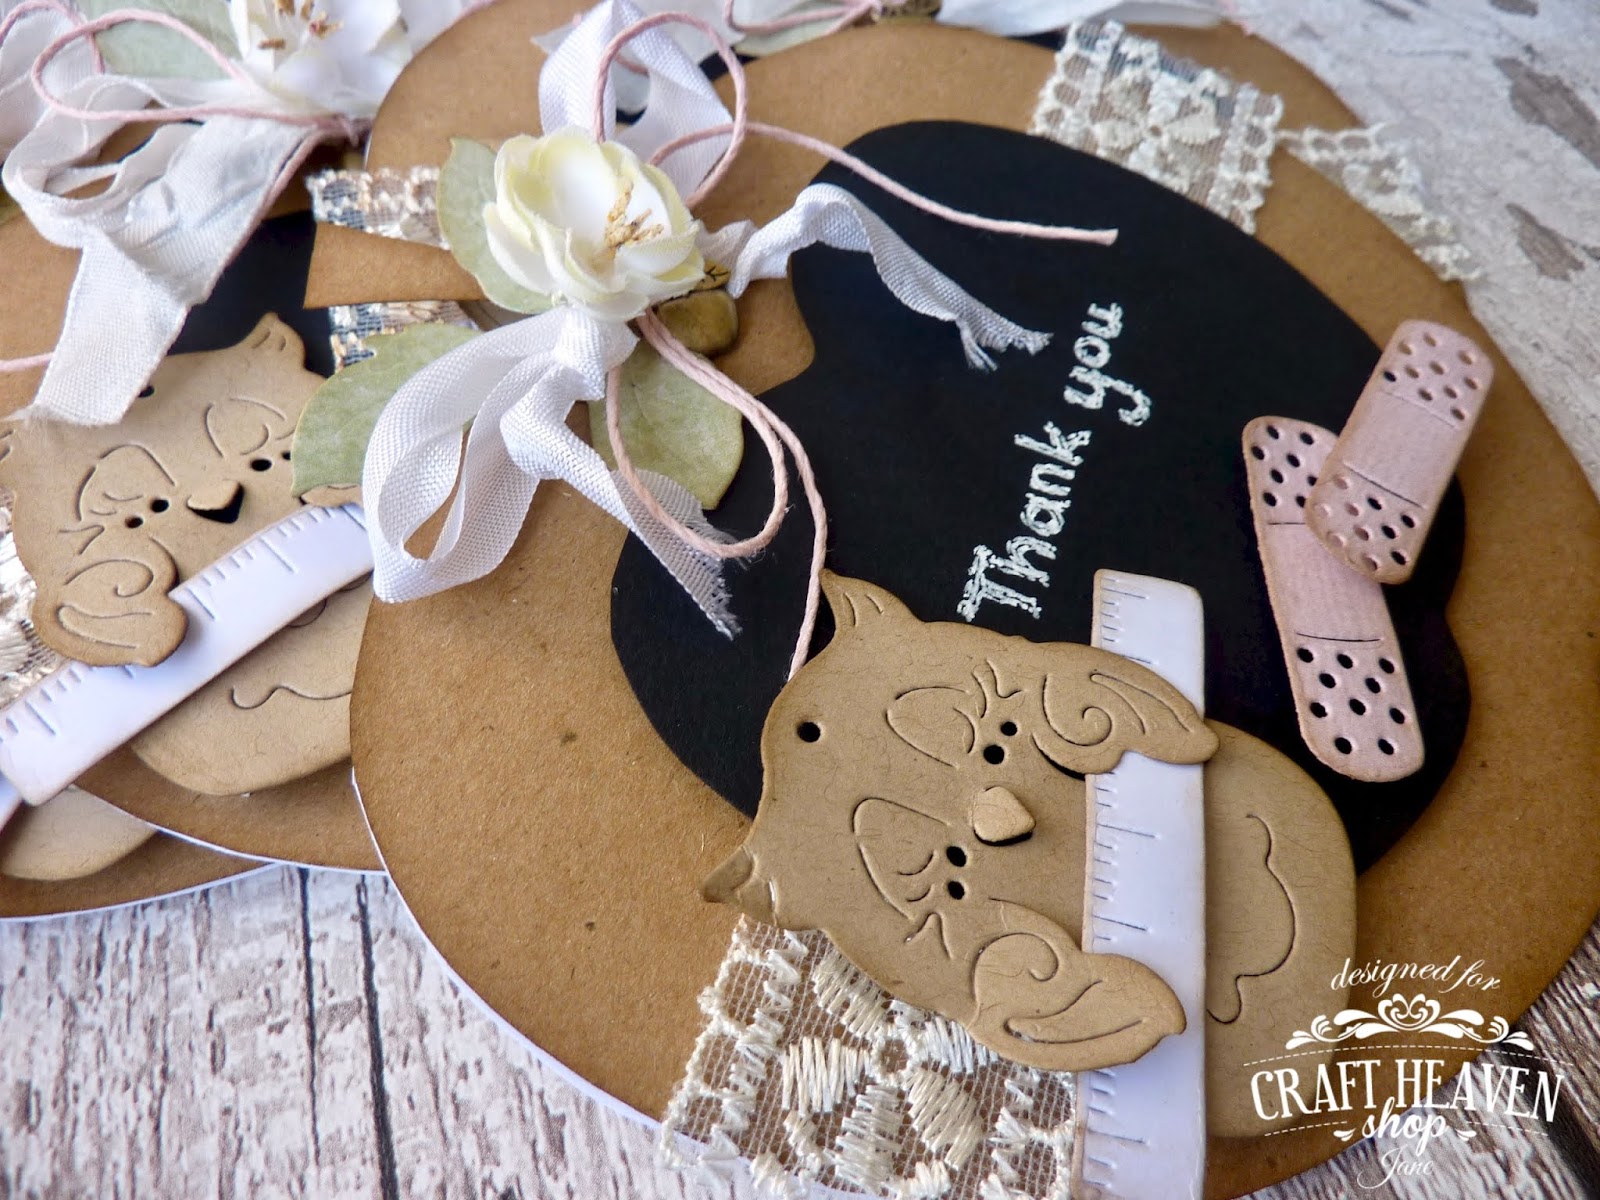
I have used the cup, saucer and teapot dies from Doohickey Volume 14, Afternoon Tea.  The papers are from Maja Design's Vintage Summer Basics Collection.


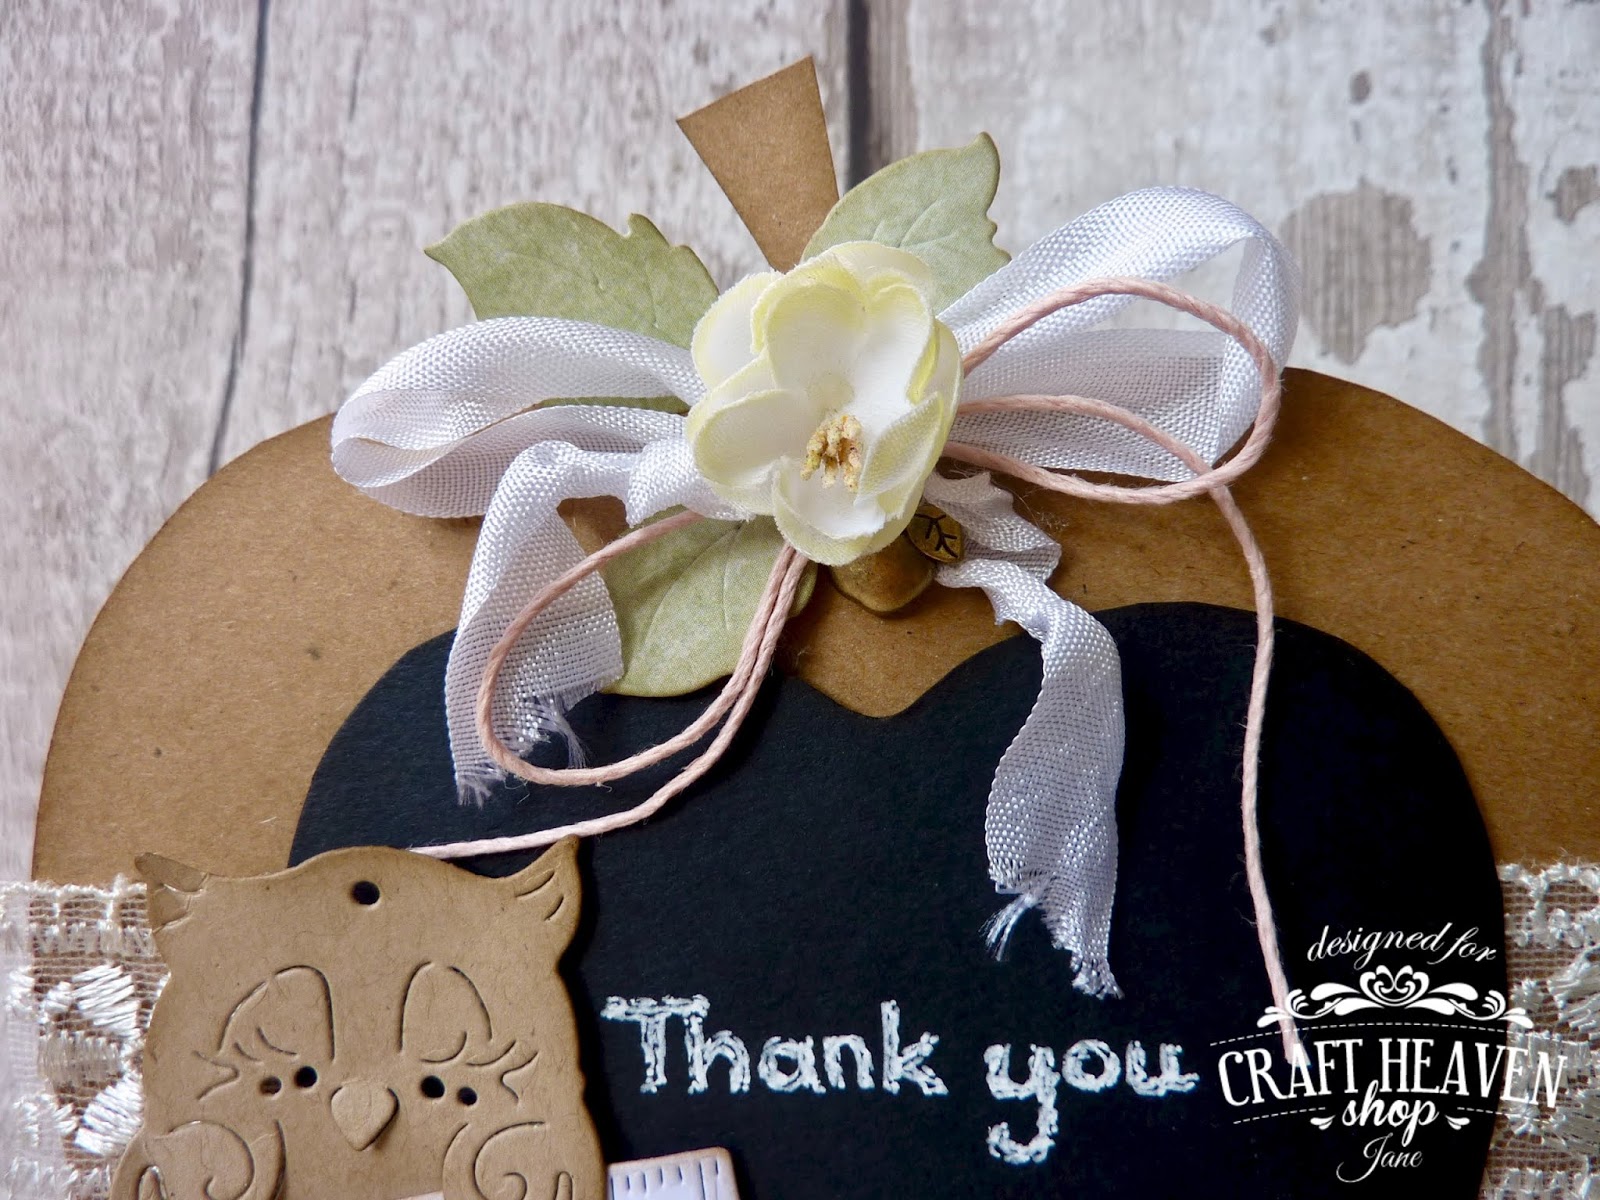
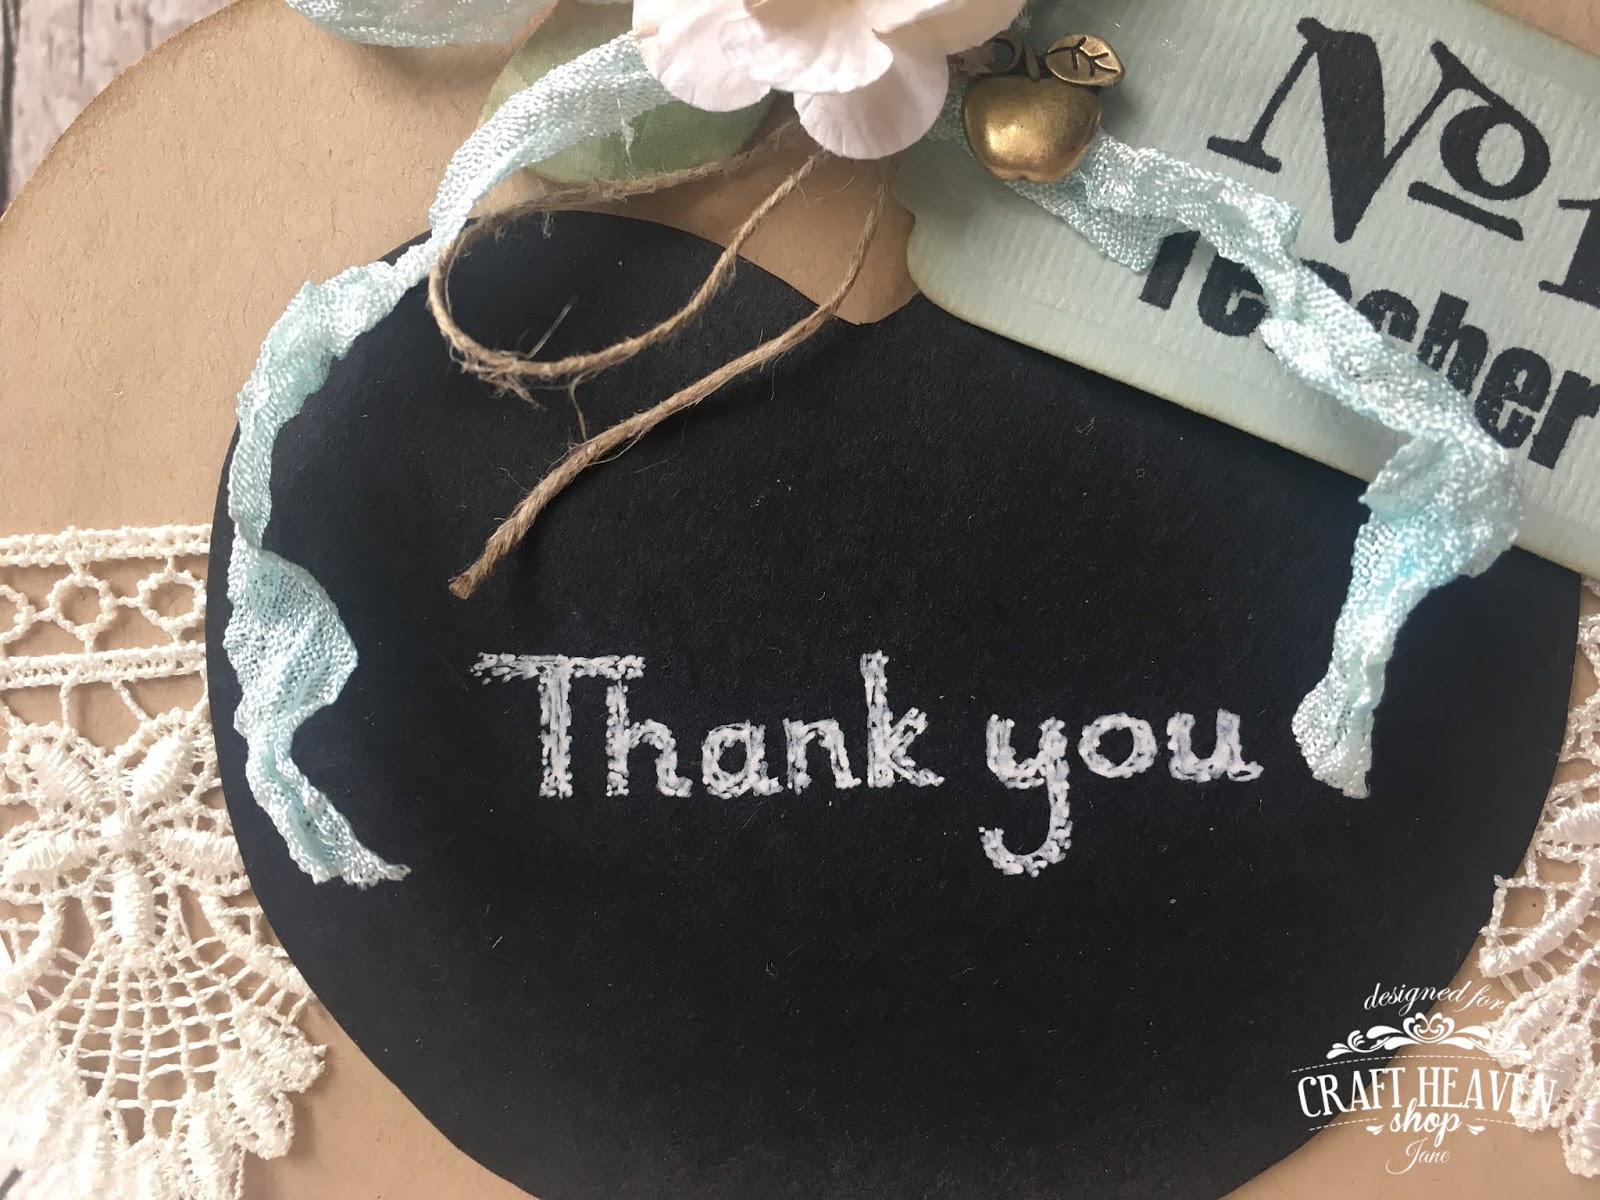
The gorgeous chipboard piece is by Laserowe.  I have added some Gesso to it here and there as well as around the edges of the card.


The lace and roses are from Craft Heaven.I made some cute tea bags using the dies from Volume 14 too.  I thought it would be fun to make them out of cheesecloth.  The 'tea leaves' are brown Flower Soft.  I love how they turned out!


I hope you like it and thanks for looking!

Wednesday, 31 July 2019

Craft Heaven DT - Teacher Thank You Cards


Good morning!  I have another card to share today for Craft Heaven.  These are the thank you cards I made for my daughter to take to school.  Same design as my last post but some extra embellishments in the form of Doohickey dies.


I used a white gel pen to create the 'chalk' writing.


The cute owl and ruler are from Doohickey volume 20, Back to School.  The plasters were also cut with a Doohickey die from Maja Design paper.


The leaves were cut with the Rose Leaf Doohickey die and the seam binding is from Craft Heaven.


Altogether I made four cards, all the same design except for the extra addition of the plasters on the first one.


I hope you like them and thanks for looking!


Wednesday, 24 July 2019

Craft Heaven DT - An Apple for the Teacher


Good afternoon!  Today I'd like to share another creation for Craft Heaven.  This was a thank you card I was commissioned to make.  I love making these apple shaped cards as teacher thank you cards each year, and I love to vary them a little each time.  This year I decided to combine my blackboard thank you cards with the apple cards to make apple shaped blackboards!


I have written the thank you sentiment by hand with a white gel pen.  I tried to make it look like it had been written with chalk!  The base has been made with Kraft cardstock.


The gorgeous vintage seam binding, lace and cherry blossom are from Craft Heaven.  I cut the leaves with the Rose Leaf Doohickey die and added some twine and an apple charm from my stash.


I hope you like it and thanks for looking!

Sunday, 21 July 2019

TOMIC DT Inspiration Post


Good morning!  It's my turn to provide the inspiration post over on the TOMIC blog today.  Today's card is one of the thank you cards I've made for the end of term.  I've used the gorgeous papers from Maja Design's Summertime Collection.


I have painted Flower Girl Tilda from the Believe in Unicorns Collection with Distress Inks and used a white gel pen to add dots to her cheeks and eyes.


The flowers and lace are from Craft Heaven and I have used a Doohickey die to cut the paper lace on the red striped paper.


I hope I've inspired you to join us at TOMIC for our Summer Challenge.  Thanks for looking!

Sunday, 12 August 2018

Teacher Thank You Cards


Good morning!  I almost forgot to show you my teacher thank you cards for this year!  They are very similar to the apple ones I have made in previous years, just slightly different colourings and embellishments.


 This year I added a little butterfly cut with a Martha Stewart punch.


 I added jute twine, an apple charm, ribbon and a hydrangea flower from my stash.


The sentiment is an old one from Whiff of Joy.

 I hope you like it and thanks for looking! x


Saturday, 14 April 2018

Tutu Thank You

 Good morning!  Today I'd like to share a thank you card I made for a lovely neighbour who made my daughter's first tutu recently.  Of course I had to put a tutu on it and the Tim Holtz Sewing Room die came in rather handy!
I cut the tailor's dummy from thick brown cardstock and sticky back canvas and cut the canvas to suite the top of a tutu.  All the edges have been inked with Walnut Stain Distress Ink.  I used lots of folded tulle to create the tutu. 
I used the buttons and cotton bobbins from the Tim Holtz die too.  The lace is from Craft Heaven and the flowers are from my stash.
 I also used the Magnolia Doohickey sewing machine, cut from black cardstock and kraft cardstock for the bobbin.  I've even threaded it with cotton!
 My favourite 'thank you' die across the centre of the card.  The background paper is from a Magnolia kit.
I used button twine from my stash on the bobbins.
 I hope you like it and thanks for looking! x


Monday, 24 July 2017

Teacher Thank You Cards

 Good morning.  I have more thank you cards to share today - this time they are for my daughter to give her teachers.  I have made several apple themed styles for teacher thank you cards over the years and was discussing with my daugther how we could make them different again this year as I don't like to do the same card twice.  Last year I made blackboard cards, and the year before, apple cards - so we decided to combine the two themes and came up with blackboards in the shape of apples!  The card shape is hand cut using my template from previous years that I have saved.
 I stamped 'thank you' on the blackboard part with white opaque Stazon.  I've stapled a piece of Tim Holtz ruler ribbon along the bottom of each card.
 The leaves were cut with the rose leaf Doohickey die and I have added flowers from my stash.
 I made three identical cards in total.  
 I hope you like them and thanks for looking! x


Sunday, 23 July 2017

End of Term Thank You Cards

Good morning!  Today I'd like to share with you some cute little thank you cards I made using the Magnolia ice-cream Doohickey die from the Easter countdown kit.  These were so quick to make - perfect when you need to make a lot.  I work in a school and am so lucky to receive quite a few gifts from children at the end of the summer term so I like to have some little cards ready to give straight out.
I chose a variety of 'ice-cream' shades for the scalloped circle backgrounds and topped each one with a black circle as I wanted a blackboard kind of feel to them.  I have stamped Thank You using white opaque Stazon and then hand drawn stitching detail around the edge with a white gel pen.
 All of the ice-creams are the same and have been inked around the edges of all the pieces with Walnut Stain Distress Ink to add definition.  They have been layered up on different amounts of foam pads for extra effect.  
 Here's a shot of all the different colours I made.  
I made ten in all.
 I hope you like them and thanks for looking! x


Sunday, 13 November 2016

Magnolia-licious DT - Anything Goes

 Good morning!  It is time for another challenge at Magnolia-licious Challenge and for this fortnight our theme is 'Anything Goes'.  I've used one of the gorgeous new Stamp & Cutz sets on this card.
 I've painted Danish Royal Opera Tilda with Distress Inks using the no line technique.  I've also added some pearls to her hair using a white gel pen. 
I wanted the whole card to look like Tilda was performing on stage.  To create the curved look of the stage I used a border die from the Fairytale (No. 9) Doohickey kit and curved it before attaching to the card.
 I used a Doohickey tag die for the sentiments and added lots of flowers from my stash and The Ribbon Girl around them.
 The gorgeous little bird was cut with the Doohickey die that comes with the stamp.  You get this gorgeous little bird and the violin die!
 I added stage curtains made from ribbon from The Ribbon Girl.
 Above Tilda I fussy cut some of the paper to create stage scenery and added some gorgeous tulle trim and a chipboard piece, both from The Ribbon Girl. 
I hope you like it and I've inspired you to join us at Magnolia-licious challenge.  Check out the rest of the Stamp & Cutz sets in the Magnolia-licious store and the challenge blog to see the rest of the team's gorgeous cards.

Thanks for looking! x